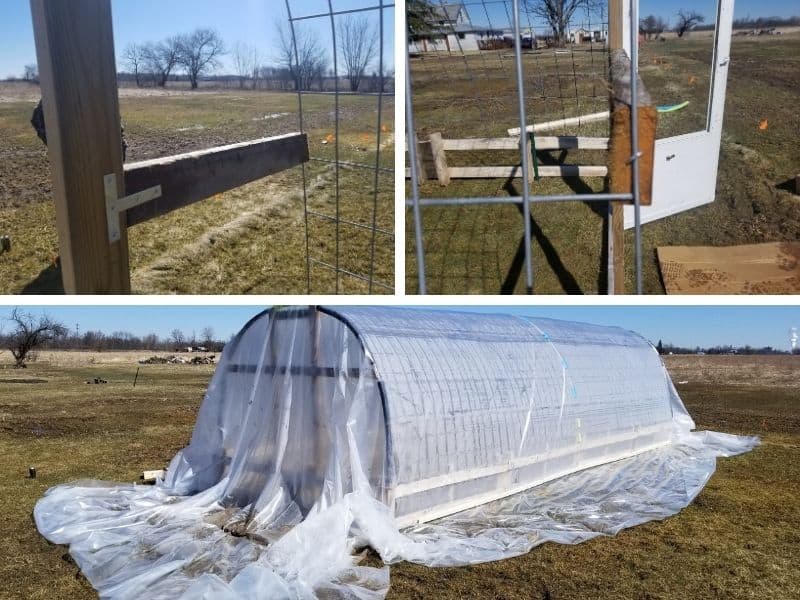
A cattle panel greenhouse is one of the most affordable and effective ways to extend your growing season while protecting crops from the elements. In this guide, we’ll walk you through how to build a cattle panel greenhouse using cattle panels and pallets, or, if you prefer, just cattle panels alone.
In the above video, I give a parts list and some estimated prices. This video is a few years old and obviously, prices have increased on many of these items bringing up what the total cost of this completed greenhouse would be. I still believe this is one of the most affordable ways to build a sturdy and large greenhouse.
Why Build a Cattle Panel Greenhouse?
A greenhouse has multiple benefits, and a cattle panel version, in particular, offers an affordable way to gain these advantages:
- Extended Growing Season: One of the most significant benefits is increasing your growing season, allowing for year-round planting.
- Protection from Weather: Hail, wind, and heavy rain can devastate crops, but a cattle panel greenhouse shields your plants from these extreme weather conditions.
- Fewer Disease Issues: A controlled environment allows you to regulate moisture, reducing the risk of disease brought on by excessive rain.
- Protection from Pests and Animals: Deer, birds, and pests will find it challenging to access your plants, and weed pressure is significantly lowered, particularly with soil you have cultivated yourself.
- Cost-Effective: Compared to traditional greenhouses, this method is significantly more budget-friendly while offering similar functionality.
Building The Greenhouse
Supplies Needed to Build a Cattle Panel Greenhouse
Before you begin, gather these materials:
- Screws and Nails: We prefer screws over nails for a sturdier build.
- Cattle Panels: You’ll need six 16-foot-long cattle panels for a 25-foot-long greenhouse. We used 50-inch-wide panels for this project, but they come in different widths.
- Pallets: In this project, we used oak pallets (which made it more difficult to build) that were approximately two feet high.
- Fence Staples: One-and-a-half-inch fence staples are ideal for securing the panels. Be sure to use pliers or needle-nose pliers to hold the staples while hammering them in.
- U-Posts: Unlike T-posts, U-posts lie flush against the pallets and provide better stability when attaching the panels to the sides.
- T-Brackets: You’ll need at least four T-brackets to secure the structure at key points.
- Pipe Insulation Foam Tubes: (pool noodles work too) This prevents the plastic from tearing on the cattle panel wire at the ends.
- 2×4’s: A few are needed for door frames and stabilizing the structure.
- Greenhouse Film: To cover the greenhouse, you’ll need greenhouse plastic.
- 【Greenhouse film size】: Fuuner package comes with one pack of 6 mil plastic…
- 【Quality Materials】: Greenhouse film is made of high quality flexible…
- 【5 LAYER TECH】: Greenhouse plastic sheeting has 5-layer-tech. UV-resistant,…
Last update on 2024-09-18 / Affiliate links / Images from Amazon Product Advertising API
Step-by-Step Instructions
Step 1: Lay the Groundwork
To start, choose your location and prep the area. Lay out your pallets where you want the greenhouse sides to go, ensuring they are approximately two feet high to provide additional height to the structure. This will raise the cattle panel arches, making the interior of the greenhouse taller and more spacious.
Step 2: Install the U-Posts
Use U-posts to secure the pallets upright. Drive the U-posts into the ground about two feet deep and screw them into the pallets. This will provide the foundation for your structure.
Step 3: Install the Cattle Panels
Once your pallets are set, bend the 16-foot cattle panels into arches and attach them to the pallets using the fence staples. Be sure to place the long wires of the panels on the outside to avoid tearing the greenhouse plastic later.
As you attach each cattle panel, zip-tie the panels together at the top for added stability. We used heavy-duty zip ties instead of wire for a quicker, more efficient process.
Step 4: Frame the Door and Ends
At one end of the structure, frame out a door using two-by-fours. The doorframe should be tall enough to fit your height comfortably. On the opposite end, construct a similar frame, leaving space for a window. This window will help with ventilation, especially during hot summer months. Use more fence staples to secure the cattle panels to these wooden frames.
Step 5: Reinforce the Structure
To prevent the sides from pushing out under tension from the arched panels, reinforce the greenhouse with more U-posts along the sides, as well as cross beams at the front and back.
Step 6: Cover with Greenhouse Film
Now it’s time to cover the greenhouse. Stretch the greenhouse plastic over the entire structure, ensuring there is enough to cover both the sides and the ends. Use pipe insulation on the ends of the cattle panels to protect the plastic from sharp edges.
Once the plastic is positioned correctly, use lath boards (narrow strips of wood) to secure the plastic to the sides and bottom of the structure by nailing or screwing them over the plastic.
Step 7: Final Touches
Install the door and any additional ventilation windows. You may also want to build raised beds inside the greenhouse, depending on your growing plan.
Not only was this greenhouse an affordable option but also it was fairly easy to build. Two men put this entire greenhouse together in just a few short hours. The hardest part of this particular build was that the pallets my friend sourced were made of oak which made the wood hard to cut and nail into but also probably added some stability and longevity to the build.
Using The Greenhouse
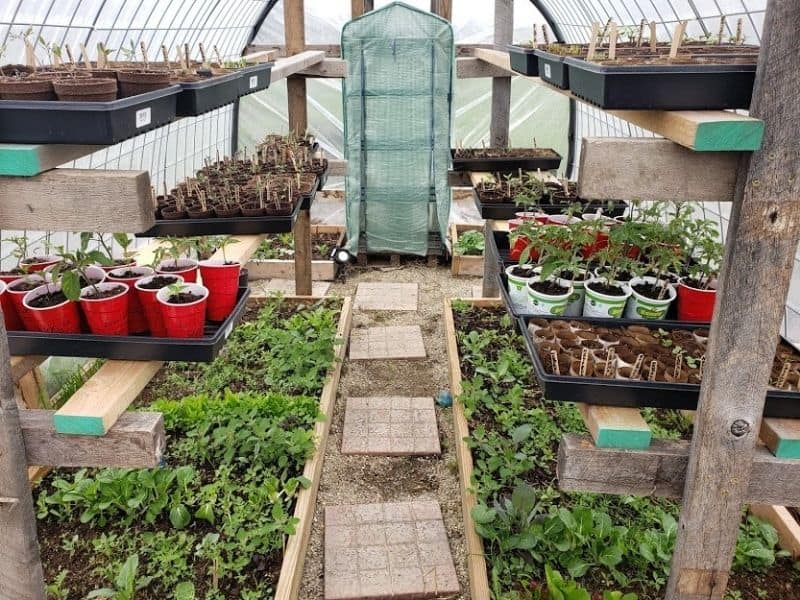
This particular greenhouse is an 8’x25′ greenhouse which provides a lot of indoor growing space. There are many benefits to using a greenhouse including season extension, reduction of pest pressure, prevention of weeds and disease, and many other benefits.
As you can see from the photo above, a greenhouse makes an excellent place to start seeds and can even provide a place for growing in raised beds as well as containers.
For More About Using A Hoophouse Check Out This Podcast Episode: Gardening In A Hoophouse With Guest Pam Dawling
How Sturdy Is The Greenhouse?
I can tell you from the many times I’ve visited my friend’s property where we built this greenhouse that high winds and extreme weather are a common occurrence and years later this greenhouse is still standing and as good as ever.
People mostly often wonder just how well a greenhouse built this way actually holds up after a heavy snow. After two years in aggressive Indiana winters, the greenhouse design has proved itself to be a cheap but also sturdy design. Below is a video of the greenhouse after a heavy snow.
Frequently Asked Questions (FAQs)
How long will the plastic last?
Greenhouse plastic typically lasts 3-5 years depending on your climate. Be sure to choose UV-treated plastic for longevity.
Do I need to reinforce the structure?
For longer greenhouses (over four panels), we recommend adding vertical support beams in the middle, especially if you live in a region with heavy snowfall.
Can I use this greenhouse year-round?
Yes, with proper ventilation in summer and potential heating options in winter, you can use this greenhouse year-round for growing a variety of crops.
Conclusion
Building a cattle panel greenhouse is a simple and cost-effective way to extend your growing season and protect your crops. With just a few materials and a little bit of effort, you can create a sturdy structure that will last for years. Plus, it’s highly customizable—whether you raise the sides with pallets, add shelving, or modify the door and window, you can adapt this greenhouse to your specific needs.